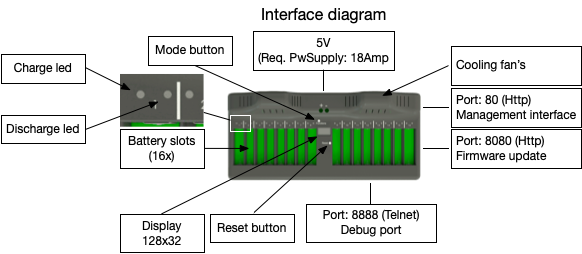
¶ Interface diagram
¶ Power supply (5v - 18 Amp)
The MegaCellCharger requires a power supply equal or greater than 18Amps at 5 volts. Connecting the power supply and the MegaCellCharger requires silicone cabling of 4mm2 minimum to ensure an effective transfer of current. When using a short cable between the power supply and the MegaCellCharger then the provided cables with the charger would suffice.
Once the power supply is connected to the mains power it is important to validate that the power supply is providing 5v. The MegaCellCharger requires the voltage to be always above 5v and not higher than 5.4v. After connecting the power supply to the charger you are now ready to power up the MegaCellCharger.
New MegaCellChargers are shipped with a factory image. This image flashes the leds randomly which is expected behaviour.
When charging all cells at maximum capacity the voltage should be checked once more on the terminals of the MegaCellCharger. Under load the power supply shall drop in voltage slightly which need to be compensated using the set screw available on most of these charger types. When charging all cells at 1Amp the voltage should not be below 5v.
when the voltage is lower than 5v a phenomenon called ‘Ghosting’ can occur which results in randomly detecting cells in slots while they are not inserted. When ghiss phenomenon is observed then check the voltage provided by the charger.
¶ Cooling fan's
When charging and discharging occurs the system shall generate heat which will be dissipated using active cooling. In case the charger is idle the fan's won't run. Make sure not to obstruct the fan's.
¶ Mode button
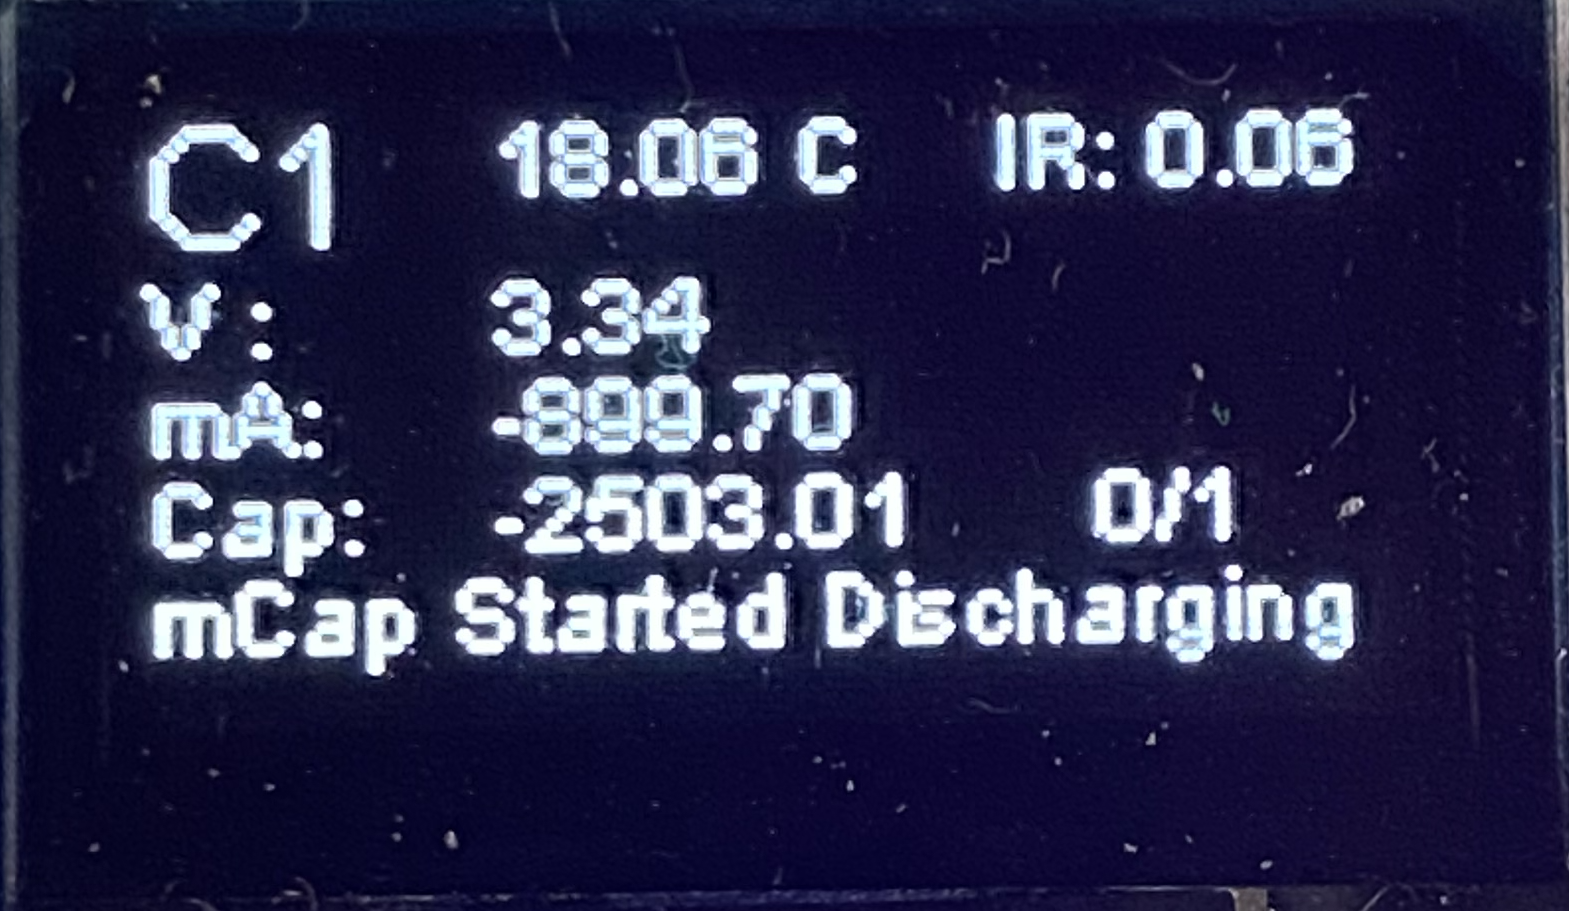
When pressing the mode button briefly the screen can be cycled through the different cells and shows the current operation, voltage and capacity etc.
To send commands to the charger the mode button should be kept pressed which cycles the charger through the following menu items:
- Start mCap ? Starts the Measure Capacity activity
- Stop mCap ? Stops the Measure Capacity activity
- Start Charge ? Starts the charge activity
- Stop Charge ? stop the charge activity
- Start Discharge ? Starts the Discharge activity
- Stop Discharge ? Stops the Discharge activity
- IP Information ? Shows the IP information received from the DHCP server in your network
- Self Test ? Starts the self test (make sure no cells are inserted in the charger)
- Factory reset ? Deletes all settings and brings the charger back to the factory defaults
- Firmware V? ? Shows the current firmware version
- Store charge ? Starts the store charge
- Stop store charge ? Stops the store charge
- Exit Push Menu
¶ Reset button
By pressing the reset button the charger is rebooted without lossing any settings. The reset button does not perform a factory reset, it only restarts the operating system of the charger.
¶ Port 8888 (Telnet)
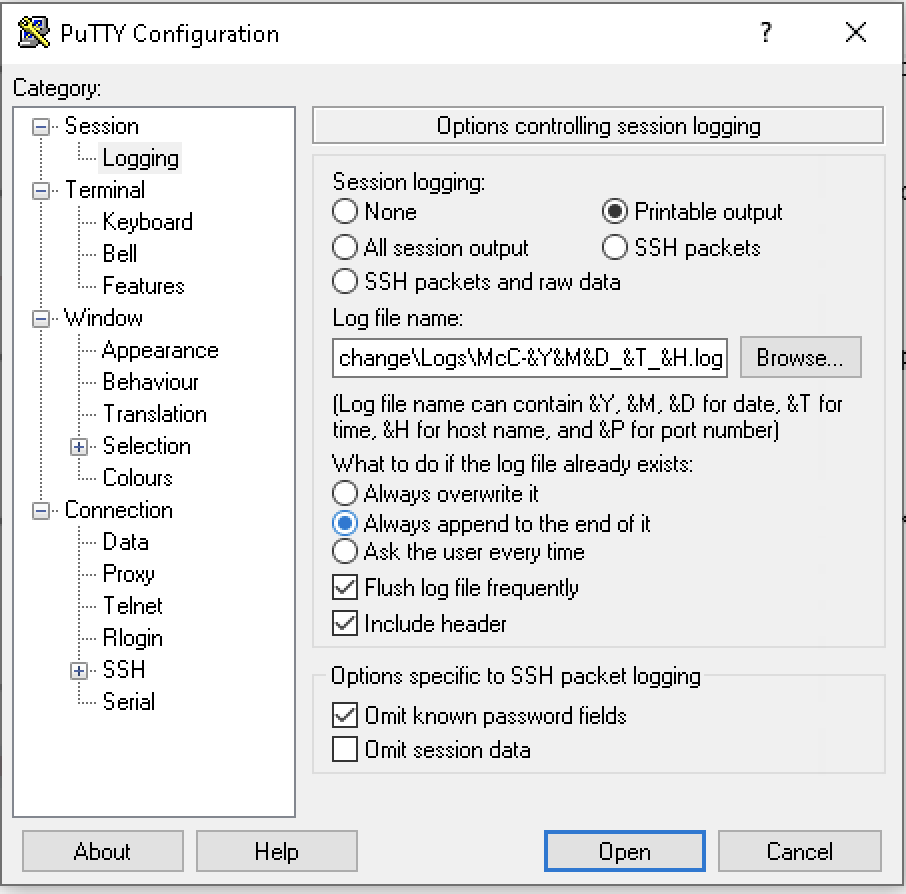
In the unlikely event something is not working as expected or you are part of the beta testers then using a telnet client to connect to the MegaCellCharger allows you to capture detailed information about the operation of the charger. For troubleshooting any issues you might be asked to provide these logs. It is recommended to use Putty (www.putty.org) with logging enabled to create a log file that can be submitted together with your support request.
C:\Connect and Exchange\Logs\McC-&Y&M&D_&T_&H.log
Putty allows you to capture a session using the ‘Printable output’ log feature. Above is the recommended value to be inserted in the “Log file name:” field which generates a file each time you start the session. Make sure to save the configuration in the default settings or in the settings file of your connection profile. As putty is an external tool we recommend you to familiarise yourself with it using their support page.
The output of the debug port 8888 looks something similar to this:
001 03:18:20.185 - (Debug) - Display X: 0
001 03:18:20.186 - (Debug) - Display Y: 17
001 03:18:20.187 - (Debug) - Display output string: inserted
001 03:18:20.195 - (Debug) - Display nRow: 2
001 03:18:20.196 - (Debug) - Display X: 0
001 03:18:20.199 - (Debug) - Display Y: 34
001 03:18:20.201 - (Debug) - Display output string: 001 03:18:20.153
001 03:18:20.529 - (Notice) - Received request to change the log levels.
001 03:18:20.531 - (Informational) - Deserialization succeeded
001 03:18:22.377 - (Notice) - Loop delay: 152.00 ms (Uptime: 001 03:18:22.377 )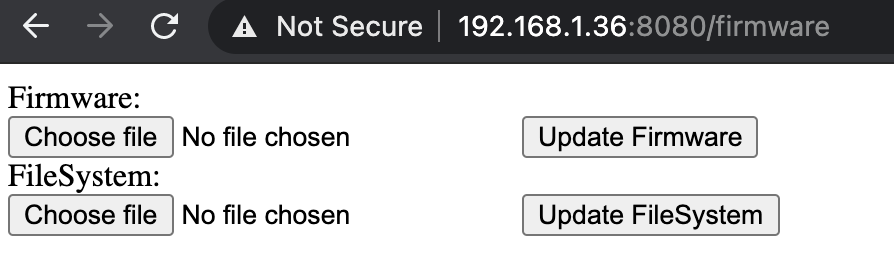
001 03:18:22.379 - (Notice) - FREEHeap: 20848 DIFF: 0 Fragmentation: 2¶ Port 8080 - Update web interface
Browsing to the IP address of the charger using the browser on port 8080 provides you with an interface that allows to flash the charger with a new firmware.
http://x.x.x.x:8080/firmware
After connecting to the firmware page you are able to upload the latest firmware from the MegaCellMonitor webpage under the section downloads. Once the Firmware is downloaded you can select ‘Choose file’ on the same row as the ‘update firmware’ button. Select the firmware from you disk and click the button ‘update firmware’.
Only use the feature when instructed post a support request. When performed incorrectly you can brick your charger and you have to then ship the charger back to the manufacturer.
¶ Port 80 (Http): Management interface
Current firmware includes a rudimentary management interface which allows for the most basic operations to be performed from a web page. Open a browser and insert the IP address of the MegaCellCharger in the address bar. A web page shall load including a few dials showing the current voltage and charging current.

This webpage is still in its infant stage and hence when no cells are inserted the dials spin erratic. Also the first 3 dials won't show unless a cell is inerted.